Saturday, December 26, 2009
Make your own iphone theme
Here's a site called iphonethemegenerator that allows you to make your iphone look like the way YOU want it to. Need a jailbroken iphone, like usual.


Changing iphone SMS tones
Found this great article on how to change your iphone's SMS sounds to whatever you want.
How to Create and Install multiple SMS Tones on Your iPhone
by RoryPiper on June 28th, 2009
Hey, RoryPiper here. One of the gripes most people have about thier iPhones, is the limited number of tones that come with the OS. Especially, the SMS tones, as there are only 6. Well, with this tutorial, I will show you how to create, and install, multiple SMS tones, on your iPhone. This is gonna take a bit of skill, on your part, but I’m going to walk you through it, as best as I can.
You will need a jailbroken iPhone, with OpenSSH and Winterboard installed. On your computer, you will need an FTP program and some simple audio editting software, something that can export to AIFF. In this tutorial, I’ll be using a Mac with Filezilla, and Audacity. There are Windows versions of both of these, if you prefer the lesser of the operating systems . Both Filezilla and Audacity are free to download.
There are 3 steps involved: 1. Creating the Tone. 2. Packaging the tone for Winterboard and, 3. Installing the tone on your iPhone.
1. Create Your Tone
First, you need to pick a sound you want for your tone. It can be a WAV or MP3, or any sound file your software can handle. Just do a Google search for “free wav”, and you’ll find something. I have chosen “Hooah!”, from Scent of a Woman. Using Audacity, simply drag and drop the file into the program. You can edit it, if it’s too long. You should keep it short. This one is just right, so we’ll export it.

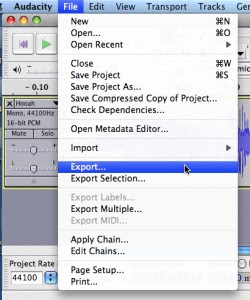
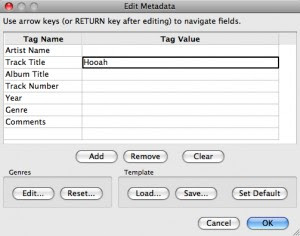
Go to File, then Export. In the pop-up, name the track. Then in the drop-down, leave the name the same, and choose desktop, as your location. It is important to get the file type correct. In the scroll down menu, choose AIFF. Then, click save. The new file will show up on the desktop as “Hooah.aiff”.

2. Package Your Tone for Winterboard
Now that we have the sound created, we need to package it for Winterboard. On your desktop, create a new folder, and name it appropriately. Mine is called “Hooah SMS Tone”. Then within that folder, create another folder and name it “UISounds”. This one is case sensitive, so make sure you spell it: capital u, capital i, and capital s on sounds. All together, with no spaces. Then, drag and drop your tone into the “UISounds” folder.

Next, we have to change the name and extension of the file, so the iPhone can recognize it as a SMS tone. All SMS tones on the iPhone are named sms-received, 1 through 6, with the extension .caf. We will be replacing the Tri-tone, so we will use number 1. Name the file “sms-received1.caf”. (In Windows you may need to change your folder settings: make sure “Hide Extensions” is unchecked, to be able to edit your extensions).

If you’re having trouble, you can download my example here.
3. Install on Your iPhone and Apply as SMS Tone
With the tone packaged for Winterboard, we now need to put it on your iPhone. This is where your FTP program and OpenSSH come into play. What was that? Did you just say: “FTP? SSH? WTF?!”. Well, this might be a little tricky for some of you, so if you’re new to OpenSSH, you can search YouTube for a full tutorial.
This has to be done over a WiFi network that both your iPhone and your computer are connected to. Open Filezilla, and log in to your iPhone. For the host, type in the IP address of your iPhone (huh?: Go into Settings, tap WiFi, then tap the arrow to right of your selected network). The username is “root”, the password is “alpine”, and you want to use port 22. It may take a few tries to get in, if you’ve never used OpenSSH before, so have patience.

In your local folders(your computer), navigate to your desktop, so that you can see the “Hooah SMS Tone” folder we created earlier. In your remote folders (your iPhone), you need to navigate to Library > Themes. Then drag and drop your folder from your local to your remote. Be careful not to mess around with anything else on your iPhone, unless you know what your doing. You don’t want to change something crucial, by accident, and then have to restore your phone. The right folder should look something like this:

The only thing left to do is make the new SMS tone active. Open Winterboard, on your iPhone. You should see your new tone in the list. Select it, and exit Winterboard. Your iPhone will respring.

Once your lock screen comes back up, go into Settings > Sounds > New Text Message, and select “Tri-tone”. You should hear your new tone!

The great thing about this method is, you can create and install as many tones as you like, while never losing your original Tri-tone sound. If you want to use a different tone, just go back into Winterboard, select a new tone, unselect the old tone, and exit Winterboard. If you want your Tri-tone back, just unselect all SMS tones in Winterboard.
Well, there you go. You are now an iPhone hacker! Kinda. I hope this wasn’t too overwhelming. I have tested this method on the 1st gen iPhone and the iPhone 3G, on fw2.x.x and fw3.0. Hope it works for you!
Twitter: @RoryPiper
How to Create and Install multiple SMS Tones on Your iPhone
by RoryPiper on June 28th, 2009
Hey, RoryPiper here. One of the gripes most people have about thier iPhones, is the limited number of tones that come with the OS. Especially, the SMS tones, as there are only 6. Well, with this tutorial, I will show you how to create, and install, multiple SMS tones, on your iPhone. This is gonna take a bit of skill, on your part, but I’m going to walk you through it, as best as I can.
You will need a jailbroken iPhone, with OpenSSH and Winterboard installed. On your computer, you will need an FTP program and some simple audio editting software, something that can export to AIFF. In this tutorial, I’ll be using a Mac with Filezilla, and Audacity. There are Windows versions of both of these, if you prefer the lesser of the operating systems . Both Filezilla and Audacity are free to download.
There are 3 steps involved: 1. Creating the Tone. 2. Packaging the tone for Winterboard and, 3. Installing the tone on your iPhone.
1. Create Your Tone
First, you need to pick a sound you want for your tone. It can be a WAV or MP3, or any sound file your software can handle. Just do a Google search for “free wav”, and you’ll find something. I have chosen “Hooah!”, from Scent of a Woman. Using Audacity, simply drag and drop the file into the program. You can edit it, if it’s too long. You should keep it short. This one is just right, so we’ll export it.

Go to File, then Export. In the pop-up, name the track. Then in the drop-down, leave the name the same, and choose desktop, as your location. It is important to get the file type correct. In the scroll down menu, choose AIFF. Then, click save. The new file will show up on the desktop as “Hooah.aiff”.

2. Package Your Tone for Winterboard
Now that we have the sound created, we need to package it for Winterboard. On your desktop, create a new folder, and name it appropriately. Mine is called “Hooah SMS Tone”. Then within that folder, create another folder and name it “UISounds”. This one is case sensitive, so make sure you spell it: capital u, capital i, and capital s on sounds. All together, with no spaces. Then, drag and drop your tone into the “UISounds” folder.

Next, we have to change the name and extension of the file, so the iPhone can recognize it as a SMS tone. All SMS tones on the iPhone are named sms-received, 1 through 6, with the extension .caf. We will be replacing the Tri-tone, so we will use number 1. Name the file “sms-received1.caf”. (In Windows you may need to change your folder settings: make sure “Hide Extensions” is unchecked, to be able to edit your extensions).

If you’re having trouble, you can download my example here.
3. Install on Your iPhone and Apply as SMS Tone
With the tone packaged for Winterboard, we now need to put it on your iPhone. This is where your FTP program and OpenSSH come into play. What was that? Did you just say: “FTP? SSH? WTF?!”. Well, this might be a little tricky for some of you, so if you’re new to OpenSSH, you can search YouTube for a full tutorial.
This has to be done over a WiFi network that both your iPhone and your computer are connected to. Open Filezilla, and log in to your iPhone. For the host, type in the IP address of your iPhone (huh?: Go into Settings, tap WiFi, then tap the arrow to right of your selected network). The username is “root”, the password is “alpine”, and you want to use port 22. It may take a few tries to get in, if you’ve never used OpenSSH before, so have patience.

In your local folders(your computer), navigate to your desktop, so that you can see the “Hooah SMS Tone” folder we created earlier. In your remote folders (your iPhone), you need to navigate to Library > Themes. Then drag and drop your folder from your local to your remote. Be careful not to mess around with anything else on your iPhone, unless you know what your doing. You don’t want to change something crucial, by accident, and then have to restore your phone. The right folder should look something like this:

The only thing left to do is make the new SMS tone active. Open Winterboard, on your iPhone. You should see your new tone in the list. Select it, and exit Winterboard. Your iPhone will respring.

Once your lock screen comes back up, go into Settings > Sounds > New Text Message, and select “Tri-tone”. You should hear your new tone!

The great thing about this method is, you can create and install as many tones as you like, while never losing your original Tri-tone sound. If you want to use a different tone, just go back into Winterboard, select a new tone, unselect the old tone, and exit Winterboard. If you want your Tri-tone back, just unselect all SMS tones in Winterboard.
Well, there you go. You are now an iPhone hacker! Kinda. I hope this wasn’t too overwhelming. I have tested this method on the 1st gen iPhone and the iPhone 3G, on fw2.x.x and fw3.0. Hope it works for you!
Twitter: @RoryPiper
Subscribe to:
Comments (Atom)